
Radio Automation and Live Assist Player


 When the "Duck for palette & players" is checked, the stream receive becomes secondary
to any locally played content. The intent here is to duck for short local content such
as local identification and branding while playing a stream. Such an ID could be a single
pick of a track from Scheduler with an interupt at the time you want the local ID or
branding played and the stream will duck for the locally played content and return the
volume when the local track finishes.
Track Prep in Radiologik Scheduler (ideal)
When the "Duck for palette & players" is checked, the stream receive becomes secondary
to any locally played content. The intent here is to duck for short local content such
as local identification and branding while playing a stream. Such an ID could be a single
pick of a track from Scheduler with an interupt at the time you want the local ID or
branding played and the stream will duck for the locally played content and return the
volume when the local track finishes.
Track Prep in Radiologik Scheduler (ideal)


 The first button "Cue" resets the player to the beginning of the track
and cues it. The second button plays. When a player is playing with
Auto ON, this button is a stop button and the next track in the
Program Queue will start. When a player is playing with
Auto OFF, this acts like a pause button so pressing play again resumes
from where it was stopped. The third
button "Fade" operates as a fade and stop. In Auto, the next track
will start at the overlap time determined in the Settings. The last
button "Ramp" sets the time the announcer can talk into a track and is
set to the current track position and recorded in the audio file.
The first button "Cue" resets the player to the beginning of the track
and cues it. The second button plays. When a player is playing with
Auto ON, this button is a stop button and the next track in the
Program Queue will start. When a player is playing with
Auto OFF, this acts like a pause button so pressing play again resumes
from where it was stopped. The third
button "Fade" operates as a fade and stop. In Auto, the next track
will start at the overlap time determined in the Settings. The last
button "Ramp" sets the time the announcer can talk into a track and is
set to the current track position and recorded in the audio file.


 Voiceovers allow you to introduce a track such as by using a voice
track over the beginning of a song. The scheduler will make use of this
for voice tracking a fully-automated station.
Voiceovers allow you to introduce a track such as by using a voice
track over the beginning of a song. The scheduler will make use of this
for voice tracking a fully-automated station.


If you place a track after a voiceover with the last characters -bed at the end of the artist, title, or album tag, that track will be a music bed and play at the ducked volume.
If the music bed track exceeds the length of the voiceover, the bed will be resized to fit using temporary track properties to shorten it so it begins a fade finish at the end of the voiceover.
If the music bed track is shorter than the voiceover, it will start partway into the voiceover so that it ends just after the voiceover.
Line In simply takes an audio device input and routes it to an audio device output. Use the Audio pane of the Settings to set which devices are used. There is also the option on the General pane of the Settings to use a fade when switching Line In on and off.


 You can open Settings from the Radiologik menu.

You can configure Keyboard, MIDI Surface Controllers, USB (D&R Mixers), Stream Deck or Game Controllers boards that can be wired for contact switches. Most of the setup can be done right in Settings on their respective panes. The palette can have USB (D&R Mixers) and MIDI controller assignments set by right clicking on the palette button to choose Assign.
 |
Many functions that are in the menus have command key shortcuts. In addition to that, there are single key shortcuts that you can configure on the Keyboard pane. |
 |
Nearly any MIDI controller can be used. And you can assign multiple MIDI controllers for any of the actions including variable controls like volume and rate. Radiologik DJ supports two-way communication so lights and motorized faders can be in sync with Radiologik DJ if you have "Send back to MIDI surface" checked. |
 |
D&R Mixers are supported. Specifically the Airlite, Webstation, Airence, and Airlab are all specifically supported by Radiologik DJ. Choose the device on the USB pane and use the Auto-assign button that appears. These mixers provide USB audio inputs and outputs that can be setup on the Audio I/O pane. |
 |
Elgato Stream Decks are also supported to assign button presses for many functions in Radiologik DJ. Visit the Elgato Marketplace to add the Radiologik DJ plugin for your Stream Deck. |
 |
For custom setup of consoles and mixers that have contact switches, you can use the Game Input pane to make assignments to an inexpensive game controller board such as the EG STARTS Zero Delay USB Encoder |


PERFORMER "Jay Lichtenauer"
TITLE "Deep 2014"
FILE "Deep 2014 Mix.m4a" BINARY
  TRACK 01 AUDIO
    GENRE "Electronic"
    PERFORMER "Various"
    TITLE "Deep 2014 Mix"
    INDEX 01 00:00:00
  TRACK 02 AUDIO
    GENRE "Electronic"
    PERFORMER "Moonbeam"
    TITLE "Ghost"
    INDEX 01 00:15:47
  TRACK 03 AUDIO
    GENRE "Electronic"
    PERFORMER "Eli & Fur"
    TITLE "You're So High"
    INDEX 01 05:32:30
  TRACK 04 AUDIO
    GENRE "Electronic"
    PERFORMER "The Maneken"
    TITLE "Run"
    INDEX 01 10:33:24
Both formats can be in the Lyrics tag. Altenatively to using the Lyrics tag a .cue format can be a file with the same path and name as the audio file but ending in .cue instead of .m4a or .mp3.

When a track with a cue sheet is loaded in a player, a popup menu of all of the subtracks appears which is functional to move the player to those time sections and also reflects the current section. Publishing uses these cue sheet artists, titles, and durations.

For tracks in the Program Queue that have a cue sheet, at CS will appear in the Actions column which you can click to show the cue sheet contents
 The Studio Timer allows you to set countdown and up timers for specific lengths or specific destination times.


<p>Add this song to top of Radiologik DJ queue: <a href="rldj:atop?/Volumes/Storage/Music/ModernMix/Media/Music/Yuri Kane/Right Back/01 Right Back (Radio Edit).mp3">Right Back (Radio Edit)</a>

</p>

<p>Add this song to bottom of Radiologik DJ queue: <a href="rldj:abot?/Volumes/Storage/Music/ModernMix/Media/Music/Mike Foyle & Surpresa/2012-10 Radio Singles/Placebo.mp3">Placebo</a>

</p>
In addition, URIs can be used to control Radiologik DJ. The form is rldj:cmd?command-here.
Possible commands where # is the player number or palette button
| start-stop-# fade-finish-# stop-# pre-listen-# pre-listen start-next start-cue-spot cue-program |
auto-on auto-off auto-toggle duck-on duck-off duck-toggle |
line-on line-off line-toggle palette-# id logo |
rldj:cmd?start-stop-1 will start or stop player 1
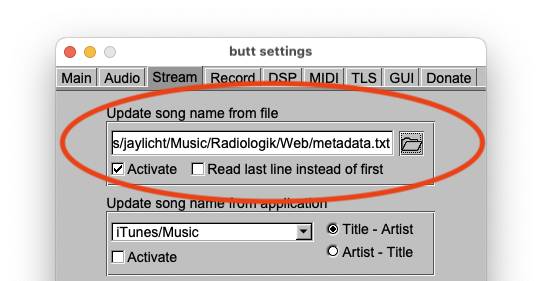
LadioCast

<rl-artist> - <rl-title>or whatever metadata replacement tags or literal text you want to that text file and save. In Radiologik DJ Settings--Publishing, turn on the checkbox "File", explained further in File Publishing. Then point the encoding software to the file ~/Music/Radiologik/Web/metadata.txt


Installing icecast is described here: https://ports.macports.org/port/icecast2/
Here are the simplest tested install directions:
First install Apple's Command Line Developer Tools using the terminal:xcode-select --installThen in the terminal:
sudo port -v selfupdateIf you had MacPorts installed before:
sudo port upgrade outdatedTo install icecast run:
sudo port install icecast2This can take several minutes. If you haven't installed Apple's Command Line Developer tools, this may prompt you to download Xcode command line tools which you should do. After which run the above command again.
Find the icecast configuration file by using the Go menu in Finder to Go To Folder:
/opt/local/etc/In there is the icecast.xml file. Drag icecast.xml to your home directory to make a copy. This will be the copy we use.
In your home directory, right-click icecast.xml to open in TextEdit. Important things to change may be passwords for admin and source. The source password is the password you'll use to connect the source audio stream. Make sure to save it with the xml extension. In addition, you may need to add a mount, perhaps like this:
<mount>
<mount-name>/stream</mount-name>
<max-listeners>100</max-listeners>
</mount>
In order for icecast to run and not complain about not being able to open log files, you need to create the folder path /opt/local/var/log/icecast/. So this requires you make those two folders 'log' and 'icecast' within that.
To run the icecast server, in terminal:
icecast -c icecast.xmlTo run it in the background automatically at startup you can make an AppleScript in Script Editor:
do shell script "/opt/local/bin/icecast -b -c ~/icecast.xml"To connect using Audio Hijack, LadioCast, or BUTT on the same Mac
Address: 127.0.0.1

Port: 8000

User: source

Password: [the password you set for source in the config file]

Mount: /stream
Then connect with Radiologik DJ Stream Receive, Music, VLC or whatever receiver at
http://127.0.0.1:8000/streamFor internet streams in the U.S., consider using Live365 as they can server your stream and take care of all of the reporting and royalty payments relieving you of the legal worries. If you choose their ad plan, use LadioCast to ensure the metadata timing is fast enough.
What is published shows in the top of the Radiologik DJ window. Published tracks are bold in the Program Queue. Publish must be checked for the output(s) used in Settings--Audio I/O.


You can also use the DJ Event AppleScript
~/Music/Radiologik/Scripts/DJEvent-NowPlayingChanged to place an
AppleScript that will upload whatever files you like to your webserver.
This script only executes when the now playing has changed. An example
is provided in the script as it is installed that you can uncomment and
adjust.
do shell script "cd ~/Music/Radiologik/Web/ ; curl -T currentlyplaying-1.html ftp://yourserver.com/ --user yourUsernameHere:yourPasswordHere"

http://localhost:8181/?artist=<a>&title=<t>&songtype=S&duration=<dms>
http://user:pass@localhost:8001/admin/metadata.xsl?song=<a>%20-%20<t>&mount=%2Fmount&mode=updinfo&charset=UTF-8
https://SuppliedRequestURL?stationCallSign=SuppliedStationCallSign&authToken=SuppliedAuthToken&title=<t>&artist=<a>&album=<l>&duration=<s>&isrc=<i>&label=<p>&stationFlag=<dpub0>&responseType=head
PS=WXYZ|rRT=<a> - <t>

It has been observed that having Music--Settings--Sync Library turned on can interfere with this operation. Use Radiologik DJ--Settings--Global--MarkScriptToDebugFile to save marking scripts to ~/Music/Radiologik/MarkingScriptDebug.scpt. You can open this in Script Editor to examine and test the marking script.
Tracks not dragging from Music to Radiologik DJ
Sometimes in Music if track file locations changed, Music will not resolve the the correct path until the track is played or you do Get Info. But if tracks play in Music and still don't drag to Radiologik DJ, a quick test is if this problem is with other apps too. Open TextEdit and set format to plain text from the Format menu. Try dragging tracks into this window. You should see the full path as text, on failure nothing. If the behavior here corresponds to the failures and successes dragging to DJ, then Music is the one not delivering the drag information. Radiologik is not at fault.
One way to solve this has been to create a new music library and import the old from an xml backup. The only data loss from doing this should be Date Added gets set to today for all tracks.
It is possible to run more than one copy of Radiologik DJ and Scheduler and have those copies use their own set of Radiologik folders. To do this, make a copy of the Radiologik DJ and/or Scheduler application(s) and add a -- and something to the name of the application such as "Radiologik DJ--Jazz" and/or "Radiologik Scheduler--Jazz". Then these copies will use folders "Radiologik--Jazz" in the Music, Logs, and Preferences folders. When launched, they will also show the appended name in their respective title bars.

With multiple audio outputs it is then possible to run more than one channel/station on the same Mac. Loopback is best for this. Applications like Audio HiJack and LadioCast can run multiple streams. All of the Radiologik application instances will still share the same one Music. It might be best to use playlist folders to keep the various playlists for each station organized in those groups.
When updating to a new version via the built-in version updater, the altered application name for each instance is kept.
When running multiple instances of Scheduler, it would be best to stagger their schedule times apart so they are not competing with access to Music. By default scheduling starts 20 minutes before program start time. Consider setting them 2 minutes apart such as 18, 20, and 22 minutes. This setting is in Scheduler's Settings.
Files for Radiologik are stored in the following locations where ~/ indicates your home directory:| Settings/Preferences |
~/Library/Preferences/Radiologik/ |
| Database & Saved
States |
~/Music/Radiologik/ |
| Scheduler Programs |
~/Music/Radiologik/Schedule/ |
| Time Announcements |
~/Music/Radiologik/Time
Announce/ ~/Music/Radiologik/DJ Voices/[DJ Name]/Time Announce/ |
| Voiceover intros |
~/Music/Radiologik/Intros/ ~/Music/Radiologik/DJ Voices/[DJ Name]/Intros/ |
| Voiceover outros |
~/Music/Radiologik/Outros/ ~/Music/Radiologik/DJ Voices/[DJ Name]/Outros/ |
| DJ Program Files |
~/Music/Radiologik/Programs/ |
| AppleScripts |
~/Music/Radiologik/Scripts/ |
| Logs |
~/Library/Logs/Radiologik/ |
| Recent/Upcoming HTML |
~/Music/Radiologik/Web/ |
| Scheduler Backups |
~/Library/Application Support/Radiologik/Backups/ |