
Radio Automation Scheduler for Radiologik DJ
Radiologik Scheduler is the companion application to Radiologik DJ. It schedules to DJ's program queue using Music playlists to allow a 24/7 fully-automated station. It can run in two different modes:
Basic (free)
Some of the basic abilities are the ability to pick single
tracks or fill with multiple tracks from playlists sequentially or
randomly, using artist/composer/album/title separation, interrupts, time matching to an
exact second or as close as possible to the top of the hour, variable
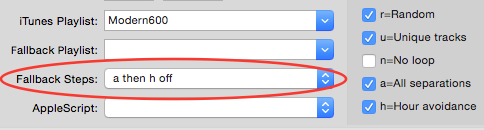
fallback steps when commands can't be perfectly met and failover script
lines when the previous line failed, as well as assigning AppleScripts
to any script line.
Advanced (extra purchase)
In addition to the above abilities, Advanced adds scheduling of
time announcements, searching for files that match various date
criteria, voiceover intros and outros which are context sensitive to
artists or exact artist and name, and traffic for managing of
spots/ads. Advanced mode can be tried for as long as you need to since
it is not time-limited but does need to be interacted with at least
every two days to confirm you are still trying it until you purchase
and enter a registration.
You can change the mode at any time by choosing "Change to Basic/Advanced" from the application menu. This menu item is not present if you registered since it only runs as Advanced registered.
The latest version of Radiologik DJ, Scheduler, & Time Announcement
files are available here:
http://macinmind.com/Radiologik/Download
Playlists, and particularly smart playlists in Music or Swinsian, give programming tracks enormous power. Because Radiologik DJ tells Music/Swinsian when it plays a track, you can use smart playlists to be sure you are not playing certain songs again for a specified period of time. This can give you a reservoir of tracks that have not played recently but enough tracks to still pick at random, effectively giving a random rotation. You can use many smart playlists for the same segment, giving you the ability to set when to play fast, medium, or slow songs or how often to play tired songs versus new songs that you may want to play more often.
Radiologik Scheduler runs the appropriate script 20 minutes before the start time and sends that set of tracks and directions to Radiologik DJ's program queue.
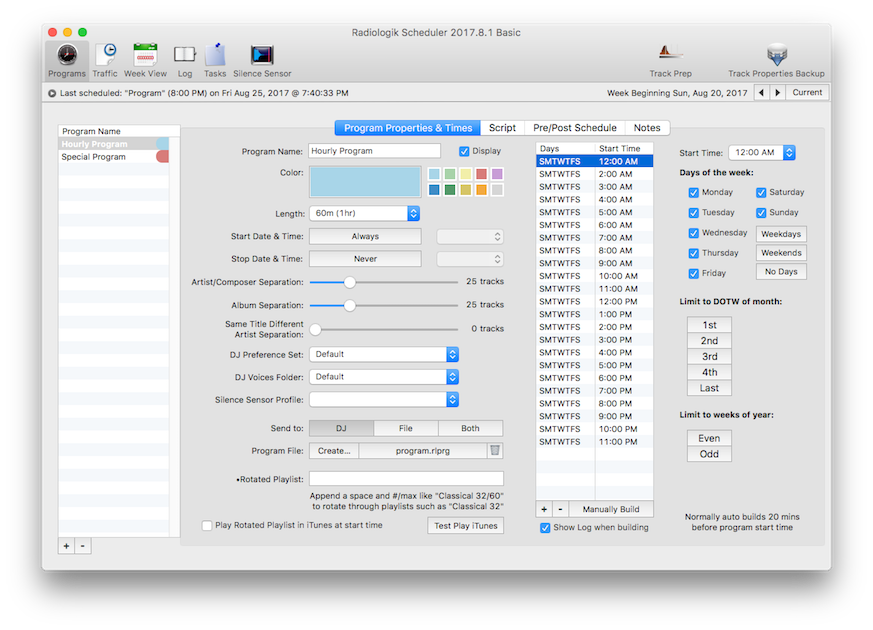
The Segment
Use the + button to add a segment. When you have a segment selected and
you press the + button, you'll get a new copy of that segment. You can
create segments of 30 - 480 minute lengths in 30 minute increments and
assign that to any 30 minute interval of any day of the week. 60 minute
program lengths are recommended for 24/7 music stations. You can create
a variety and schedule them for different times of day and different
days, alternating weeks etc to make a variety. You can name it anything
you want. The name is for your organizational purposes. You can reorder
your segments by dragging them around in the list. This has no bearing
on how it schedules except in the case of scheduling conflicts in which
case it uses the top item. So you can use the order for your own organization
generally and you can use it functionally to have the top segment win in a conflict
such as to allow special date range programs to coexist with the regular
schedule.
Then you can choose the separation amounts desired and the preference set that should be set for the DJ for each segment. For instance, my Rock segment I like 15 track artist separation but for my softer classical which has a lot of Bach, I need the artist separation lower at about 10 since it's hard to avoid Bach and I like the overlaps at just under a second since most of these tracks have a long buffer but I like all of the other pieces used elsewhere in the station to sound less rushed.
A segment can be set to many different times so the segment can be reused like a template. Set the start time and the days of the week. You might come up with a few segment "templates" for a single format station and then repeat that script for various times. This doesn't repeat the content, it just uses the same script.
You can give a segment a start and/or stop date for instance if you
have a particular program you want to run only in a particular season.
For each segment time you can choose which weekday of the month such as
2nd and 4th Tuesday or you can alternate weeks by using Even or Odd
weeks of the year.
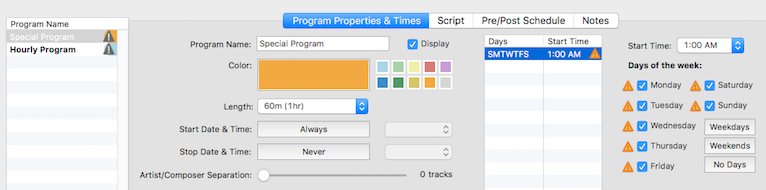
Use the week view tab to check that you've filled the schedule as expected. It will show if your segments conflict.
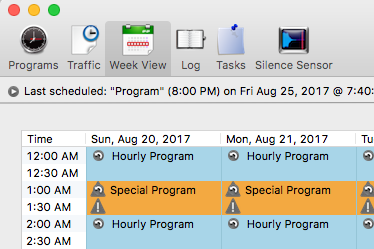
The program properties will also indicate exactly where the conflict exists:
Script
Commands
You can add and remove script lines using the + and - buttons
below the script list. If you have an item selected, pressing the +
button makes a copy of that line. You can remove multiple lines by
selecting them and pressing the - button. You can also copy and paste
lines.
Times in the script are relative to the start time of the segment so if your start time is 8:30 PM, 05:02 would be 8:35:02 PM.
There are three commands for Basic:
Simply put, categories are Music or Swinsian playlists. More specifically categories are exactly how you define what your Music/Swinsian playlist shows. Since each pick or fill command can use a different playlist, this is how you accomplish the alternation of categories.
A simple way to categorize is to use the Comments in the tags in Music to put your category assignments. Then have your smart playlists match rules that select those comments.
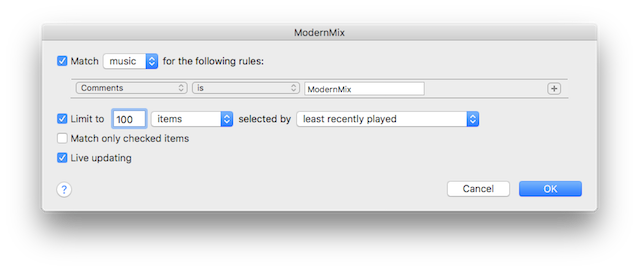
So I don't repeat songs too soon I have it only show a
percentage of songs with this comment. In the case above I have 400
songs with the comment "ModernMix" so I choose to show 25% of the least
recently played which is 100.
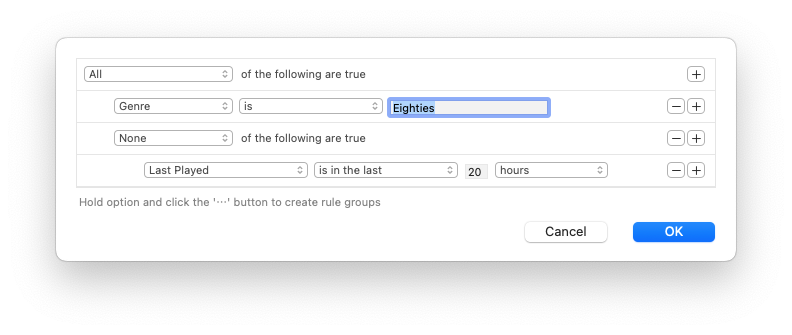
When using Swinsian Smart Playlists, the construction is a bit different. Here's an
example of showing all of the tracks in the "Eighties" genre that have not played in
the last 20 hours. To do this, create a rule group to create the none
of the following rules and sub rule of Last Played. Unlike Music where last played
can only be as short as days, Swinsian allows hours, minutes and even seconds.
Smart Playlists are better than categories
Playlists can be extremely specific or very general.
They are a collection of attributes. A song can be in more than
one smart playlist at a time.
Here's an example of being both specific and general. I have the following comments in my music:
Here's another example with tracks with the following comments:
Special Playlists for rotating Music/Swinsian
playlists and silence breaks
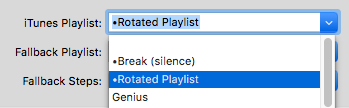
There are two special playlists which appear at the top of the
playlist menus which are just in Radiologik Scheduler and not directly
from Music or Swinsian.
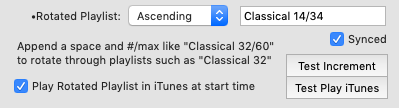
This would work if you have 34 Music/Swinsian playlists like:
The rotated playlist shown above that will be used next is "Classical 14" and at the point at which it is either used in a script or used to play this playlist in Music (Swinsian play not supported yet), the text in that field will change to "Classical 15/34" for the next time. It will continue until it plays "Classical 34/34" at which point it will increment back to "Classical 1/34".
You can choose to run through the rotation in Ascending order, Descending Order, or you can choose "Different" which chooses a randomly different playlist.
By default, the lower limit of the numbered playlist is 1. But you can define a lower limit. For example, if all of your playlists are:

The Synced checkbox allows you to keep the increment of the rotated playlists in sync across multiple programs that use the same root playlist name and also have Synced on
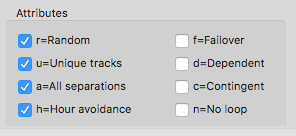
Allows you to add tracks in the order of the playlist without repeating through the playlist but it will allow the same track to be programmed more than once or already be in queue if u = unique is off. Useful if some audio files need to be in a certain playlist order and some of those files are used more than once.
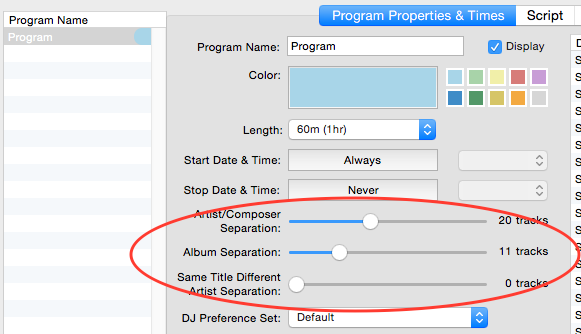
This attribute applies artist, composer (if preference is set), album and title separation. It works regardless of whether other script lines had this attribute. Artist separation uses substring searches using separators in an artist tag to better detect the same artists with guest artists in the artist tag. The separators are:
The separation also uses the composer tag but only separates composers to composers and artists to artists. Multiple composers are compared to multiple composers by using the separator of / with or without spaces. There's no particular limit to the number of composers per song.
Album Separation is useful for various artist albums where artist separation will not prevent proximity on the same album.
Title Separation is useful for separating tracks that have the same title but may be peformed by different artists such as with Christmas music or American Standards. It is more of a niche need and should not be misunderstood to do the job of rotation that a smart playlist showing least recently played tracks and u=unique does.
Separation is done overall on the tracks so far
programmed in the
script or in DJ's queue regardless of whether other lines used
all separation. It is case-insensitive.
If you want to fade down a segment to silence and not play anything at a specified time, you can make your last script with a 30:00 or 60:00 interrupt @ time (respective of the segment length) and have it pick from the "•Break (silence)" playlist to place a short 5 second silent file. Make sure your minimum fill before the interrupt is enough to cover us to the interrupt. The scheduler makes a really good attempt to get all the times figured correctly but to be safe make your minimum something like 3 minutes extra past the overlap to make-up for any differences in the reality of playing. So you would fill to a minimum of 33:00 or 63:00 depending on the length of the segment.
Minimum, Maximum, and Exact time searching
You can set a min or a max, both, or nothing for min and max.
Min and max times are minutes relative to the start time. These times are cumulative times for the whole segment, not limited durations for each script line. If our program start time is 3:00 PM then a min of 16:15 is 3:16:15 PM. If your program starts at 3:30 PM then an min of 16:15 is 3:46:15 PM.
If you set a min, it says, just make sure the track you pick or fill exceeds this number of minutes and seconds into the program segment.
If you set a max, it says, just make sure the track you pick or fill with doesn't exceed this max into the program segment.
If you set nothing for min and max then 1 track is picked without regard to time. Fills will work like picks when there are no min or max values.
And if you do both min and max then you are putting both constraints on your pick or fill. But beware not to give it a constraint that it can't accomplish such as a min and max too close in which case it will have to fail that script line command if it can't find anything short enough to fit.
However if you use a min and max that are identical like min 50:00 max 50:00 it will search for a track to get to that exact second.
Top of the Hour figuring
Use "TOTH" in the minimum time field with a fill command if
your segment starts at the top of the hour and you want to continue the
same music format without interrupting at the exact top of the hour.
This will find the best place to put a Station ID.
For the previous segment, make sure you have not completely filled the segment since each new segment can fill the short in the previous segment in figuring the best placement of the station ID. Consider where most of your song times are. To consider all songs between 5 mins and 3:30 length fill minimum to 55:00 and maximum to 56:30 for the last script line.
This function uses a search to find the best time fit to the top of the hour searching either side of the top of the hour in incrementally larger widths up to 10 seconds on either side of the hour. Failing that it falls back to looking at the track that crosses over the top of the hour to determine what the best position is either before or after the hour depending on how much the track crosses over the hour. If it determines before the actual top of the hour, it will place the next script line, say a pick from a station ID playlist and continue with the script. If it places the TOTH before the actual top of the hour, it is possible that the next script line will program a song that would have put the top of the hour position closer on the over side but in most cases this will still be the best position of the top of the hour.
TOTH works for the top of hour at the beginning of the segment for a segment starting at the top of the hour. It finds the first top of the hour encountered when a segment starts at the bottom of the hour. If your segment is multiple hours, the TOTH will find the closest top of the hour relative to where it currently is in time in the script. But it will not find the TOTH of the next segment.
Script
Example #1 (Exact Start 30 mins)
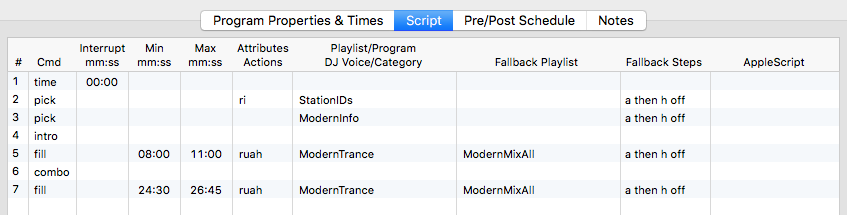
This script above for 9:30 PM starts with an interrupt @ at the bottom of the hour which here is 00:00. I use an interrupt @ precisely because nothing was playing in Radiologik before this segment as other software in the station is running. It is a 30 minute segment leading to 10:00 PM. The Station ID plays at exactly the bottom of hour (not legally required but still nice since in my case I'm changing formats) and is followed by a single file I have in the ModernInfo playlist. I added an intro for the proceeding script lines first track. After that it fills from between Min 08:00 and Max 11:00 (9:38 PM and 9:41 PM) with songs from the ModernTrance smart playlist in Music or Swinsian. I put in a combo which picks an outro, combo connector (sweep/jingle) and an intro. Then I fill with more music from ModernTrance. I stop short of filling to the top of the hour at 10:00 PM since I want that next segment to figure when to put the ID by finding the best track to get to the top of the hour.
It is important to leave enough room for the next segment to have a chance to find a fit for the top of the hour (TOTH). The room I leave at the end of this segment is a range in which many songs can be fit to the second to the TOTH. I looked through my playlist "ModernTrance" sorting it by time in Music or Swinsian to survey my song lengths. I found that my inventory of songs covers every second from the length of about 3:00 to 5:00 so I decided on a range of 24:30 (5:30 away from TOTH) to 26:45 (3:15 away from TOTH) as my min and max times.
Script Example #2 (hour-to-hour 1 hour)
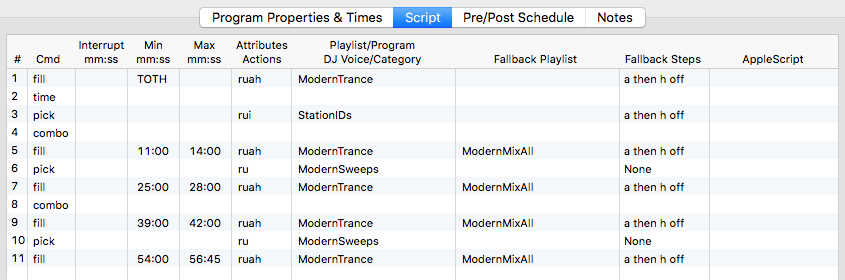
This script is for 10:00 PM. I start with a fill to TOTH to get us a track that gets us as close as possible to the exact second that is 10:00:00 PM. Then we do the time announcement and the ID and then back to the pattern of music fills, ads sweeps making sure to keep us somewhat on-time by using fills with min and max width ranges about the size of a song to a half song length. The last fill is min 54:00, max 56:45 which will allow lots of possible perfect matches to get to the top of the hour again in the next segment.
Attributes ruah (random, unique tracks, all separation, hour avoidance) are normal good practice for programming music tracks. But you probably want some of these off when it comes to ads and jingles/sweeps you may have added inbetween songs using pick commands since maybe all your sweeps/jingles have the same artist such as your station name. But keep the u (unique) attribute for your sweeps/jingles to keep them from repeating if they don't have to.
Script Example #3 (exact stop)

Here's a script where I want to end Radiologik playing. Again I fill from the previous segment to try to get to the top of the hour but in this case I've done it differently by using the same time for min and max of 00:00. Unlike the TOTH which will go either side of the hour if it can't match the exact second to the hour, this will instead allow it to schedule beyond the hour so we make sure we don't have silence before the exact top of the hour segment. If the song happens to go longer than the top of the hour, the next command to pick at 00:00 with an interrupt @ will fade the previous track in DJ at the fade rate determined in the Settings in DJ.
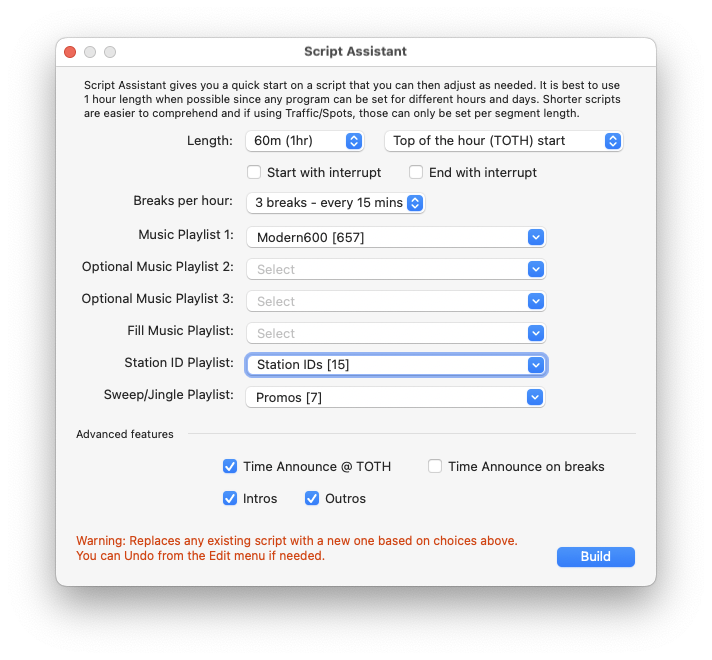
Script Assistant
Script Assistant is useful to beginners and pros as a quick start to build a simple or sophisticated script.

Fallback procedures
If qualifying tracks cannot be found, Radiologik Scheduler runs
through several fallbacks to help ensure it is programming something.
For each fallback, all tracks in the playlist are considered before proceeding to
the next fallback.
If you make your minimum and maximum times too close together such as 30:00 minimum and 30:05 maximum, there's a really good chance the scheduler will not find a track to match.
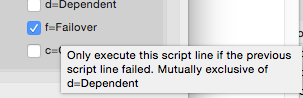
You can have a specific line that runs on in the case a script line fails. Add a script line after the potentially failing script line and use the failover attribute to indicate this line should only run if the previous line failed.
Failover lines only work after failed pick, fill and date commands.
AppleScript
Choose the AppleScript from the menu at bottom of the Window. That
Applescript is run when the first track programmed for that script line
plays in DJ. Place your applescripts in ~/Music/Radiologik/Scripts/ for
them to appear in the menu. Use the Refresh Menus command in the File
menu to update all menus for changed items.
Week View
This is a useful reference to see if you've filled all of the
week you expect to and also to check for conflicts of segments. If
there's a conflict, it will show on that block in this view.

File transfer allows you to setup an upload or download. For downloads, you can set either a local folder to download to, preserving the original name, or choose a file. If you choose a target local file, the downloaded file will be renamed exactly as the target local file, replacing the local file.
Advanced features are available when Radiologik Scheduler is running in Advanced mode. Either Advanced or Basic will show in the title of the scheduler window to indicate which mode it is running in. You are asked which mode you want to run on the first launch but you can bring this dialog back up by holding option when launching Radiologik Scheduler.
[time] Time Announcements
Use the 'time' command to place a time announce marker in the
script like you would a pick or fill. Time Announce will only work if
the AIFF files ranging from 0000.aif for 12 o'clock to 1159.aif for
11:59 are in ~/Music/Radiologik/Time Announce/. In addition,
hour-agnostic time files can be used by the format xx00.aif to
xx59.aif. You can create these
files yourself in your own voice or download them in my voice from http://macinmind.com/Radiologik/Download/.
Time announcement files are dynamically selected by Radiologik DJ to
always be the correct time. Radiologik DJ will announce 5 seconds or so
before the next minute as the next minute. Time announce tracks will by
default always have their overlap set to zero seconds to make sure they
are
never overlapped by other content. But this can be changed in the
Global pane of the Radiologik DJ Settings.
Minute-only time
Use files xx00.aif - xx59.aif to announce the minutes without regard to
what hour it is.
Voiceover time
Use files 0000-vo.aif - 1159-vo.aif or any other time formats like xx00-vo.aif - xx59-vo.aif with -vo appended to the name but before the extension to have them programmed as voiceovers that duck over the next track's ramp.
10 varieties
For every file you can additionally use 9 more varieties by using a -# at the end of the filename but before the -vo for voiceover times. eg. 0000-1.aif - 1159-3-vo.aif or xx00-5.aif - xx59-7-vo.aif. Varieties are chosen at random.
The year in the first two formats is only used as a placeholder to determine it is a date format and the year itself is not matched. The search looks for these patterns anywhere in the title so you can have text before and after your date and it will still find it.
Format
Example
YYYY-MM-DD
2017-01-08 MM-DD-YY 01-08-17 YYMMDD (only at beginning or end of track title)
170108 Month D, YYYY
January 8, 2017 Mon D, YYYY
Jan 8, 2017
Example titles: 'This day in History 1958-03-29' will only match on March 29th of any year. '520404 (36) Fools Gold' will only match on April 4th of any year. 'Tip of the Day Feb 9' or 'The February 9th 2010 Tip of the Day' will only match February 9th.
If no match is found it resorts to the fallback playlist and if no match is found there it fails the script line. You'll need to have other script lines ready to make up the time should it fail or use a failover script line.
In addition to the [date] command there are 6 variations which are described in the interface. Four variations cover 2 days before and after for five days of possible matching, one that just looks for the month [month] command, one that matches the full day of the week in your system language [dotw], and one [date=] that searches both title and comments to match the date using the year.
[pick] [intro] [outro] and [combo] command
Voiceovers
An intro voiceover introduces the next track and will use the ramp of
the next track to determine if and how to voiceover the actual track
this way:
[pick]
Any pick command can make that selected track a voiceover in DJ by
using -vo at the end of
playlist name in Music or Swinsian, or at the end of the title, artist, or album
as set in Music or Swinsian. For example, you might have a title
intro promo. To make it a voiceover,
make it intro promo-vo.
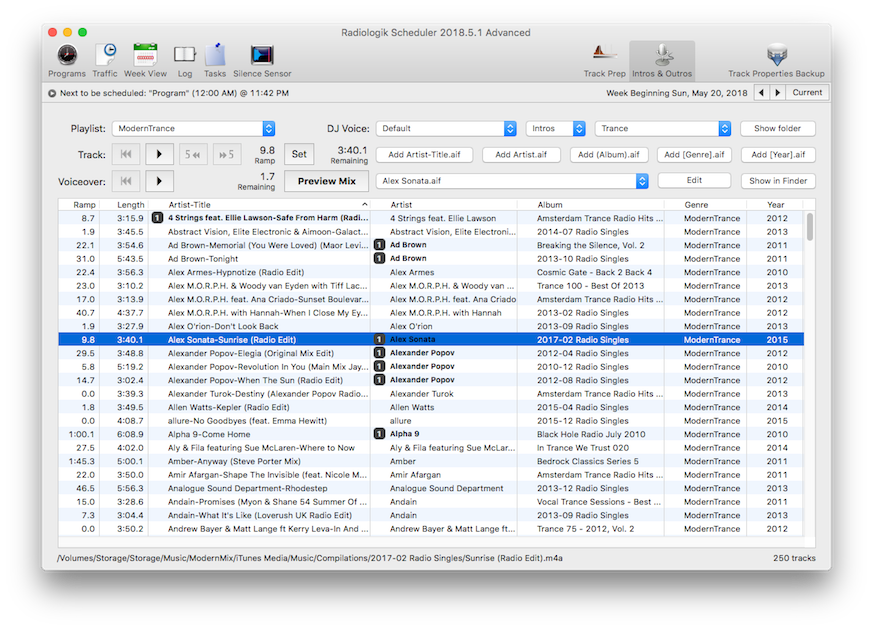
Create and Manage Intros & Outros
Voiceovers are also done using the intro and outro commands in the script which will dynamically choose voiceover files specific to your tracks. Those Intro and Outro files can be created, edited, visualized and tested on the Intros & Outros pane. To use this, pick a playlist with the tracks you want intros and outros for. Choose the DJ Voice, Intros or Outros and subfolder if any exist. You can then use the add buttons to add the different types of intros or outros which will create a new file named correclty and opened in your favorite audio editor. I recommend Amadeus Pro or Amadeus Lite (Pay) or ocenaudio (free). These are the files used by the intro, outro and combo commands described below.
[intro]
The intro command should be placed in the script before the line that picks
the track you want to voiceover.
The intro command will look for matches in the
~/Music/Radiologik/Intros/ or the
~/Music/Radiologik/DJ Voices/[dj name]/Intros/ folder.
The command that follows can be pick,
fill, or even date. Voiceover types are searched in this order:
1. artist-title.m4a
The intro command will first look to match the artist and title in a
pattern of artist-title.m4a
2. artist.m4a
If it doesn't find it by above, next it looks for just the artist in
the pattern artist.m4a. So you
can have a specific voiceover intro file for an artist and song or a
general fallback to just announce the artist.
3. (search title).m4a
If it doesn't find it by any of the above, you can also match a
partial title of a song in paranthesis. For example, the title
Light as Air (Radio Version) will
look for the intro file (Radio
Version).m4a.
4. (album).m4a
If it doesn't find it by above, you can also specify a
voiceover for an album by using parenthesis around the album name in
the pattern of (album).m4a.
5. [genre].m4a
Next it looks to match the genre inside the brackets so for the
genre Rock it will look for [Rock].m4a.
6. [year].m4a
Next it looks to match the year in the year metadata/tag so for the
year 1983 it will look for [1983].m4a.
7. [grouping].m4a
Lastly it looks to match the grouping inside the brackets so for the
grouping Premium it will look for [Premium].m4a.
When the intro file is brought into the DJ after it is scheduled, it is set with voiceover on so you'll see the checkbox in the VO column is on. With this box checked the voiceover file will overlap the next track no more than the ramp time on the next track. It will also duck the next track while playing by the amount set in the Settings. Usually 20-40% is good. For this reason you'll need ramp times set properly for your tracks or else if they are zero, the voice over will not duck and overlap the next track but just start it when the voiceover is done playing. In some cases with vocals that start right away or certain genres, this would be the desired behavior.
[outro]
Outros are selected the same basic way using the outro command which
should be placed after the command in order to announce the last track.
The outro command will look for matches in the
~/Music/Radiologik/Outros/ or the
~/Music/Radiologik/DJ Voices/[dj name]/Outros/ folder.
1. The outro command will first look to match the artist and title in a pattern of artist-title.m4a in the folder ~/Music/Radiologik/Outros/.
2. If it doesn't find it by above, next it looks for just the artist in the pattern artist.m4a. So you can have a specific outro file for an artist and song or a general fallback to just announce the artist.
3. If it doesn't find it by any of the above, you can also match a partial title of a song in paranthesis. For example, the title Light as Air (Radio Version) will look for the outro file (Radio Version).m4a.
4. And lastly, if it doesn't find it by above, you can also specify an outro for an album by using parenthesis around the album name in the pattern of (album).m4a.
Both [outro] and [intro]
In addition to this for both intros and outros, you can use 10
varieties by using a -# in the file such as artist-title-5.m4a or artist-9.m4a or (album)-7.m4a. These intro and
outro varieties are then chosen purely randomly.
Intros and Outros can also be DJ voice specific. Use ~/Music/Radiologik/DJ Voices/[DJ Name]/Intros/~/Music/Radiologik/DJ Voices/[DJ Name]/Outros/. See DJ Voices in the topic below.
In addition to this, you can organize your intro and outro aif files anyway you like, nesting in folders in a way that make sense to you.
One caution: When placing an outro just before an intro, be sure that the outro is at least one second and that you have added at least the default overlap of silence to the end of the file so that the intro isn't talking over the outro and also so that the outro is long enough that it doesn't require a triple-segue on the 3rd player thus interfering with the intro being a voiceover on the 3rd player.
[combo]
The combo command is a combination of the intro and outro in one
command. It is better than using an outro and then an intro since it
combines an outro and an intro into one file and stores it
~/Music/Radiologik/Combos/ and and adds it to the queue from there.
When using combos, you should make sure the amount of trailing silence on your outro files and leading silence on your intro files provide a natural sound when they are put directly together. With DJ version 2012.9.1 and later, outros always have an overlap of 0 so it is generally good to have your outros with 0.25 seconds of trailing silence to give a natural pause between it and anything that follows. Likewise intros should have 0.25 seconds of leading silence so that you have about 0.5 seconds of silence between the two phrases. With outros edited with little to no trailing silence, you should have OverlappingOutros unchecked in the Settings on the Global pane in order to have the outro command continue to work properly with these files.
Combo Connectors
You can place audio between the intro and outro of a combo file by
providing .m4a, .aif or .aiff files in the ~/Music/Radiologik/Combo
Connectors or relative DJ Voices folder. The resultant combo will then
be an intro-combo connector-outro all working as a voiceover and using
the ramp over the next track. Combo connectors are chosen at random.
Use combo connectors for jingles, station monikers, or any branding or
speech you would like to randomly place between outros and intros.
Whatever files are found of the intros, outros or combo connectors will
be placed by the combo command. So there are all of these possibilities
depending on the files available:
outro-connector-introCombo files are meant to be disposable and Scheduler will prune the ~/Music/Radiologik/Combos folder once a week to remove tracks that were modified one week or older. You can also use the File menu item to do it manually.
outro-intro
outro-connector
connector-intro
outro
intro
connector
Note: On Apple Silicon Macs M1 and up, Rosetta must be installed for combos to work.
Run this command in terminal to install Rosetta 2:
softwareupdate --install-rosetta
[twin]
The twin command works like a pick to select two random tracks from the same random artist. To use it you just select a playlist and place two of these twin commands anywhere in the same program script. It is restricted to the attributes r=random and u=unique. No artist separation is performed and no track actions can be assigned. But having the twin command used as two twin commands, you have the freedom to place other content between the two twin commands such as a playlist that announces a twin spin and or an intro or combo.
[upnext]
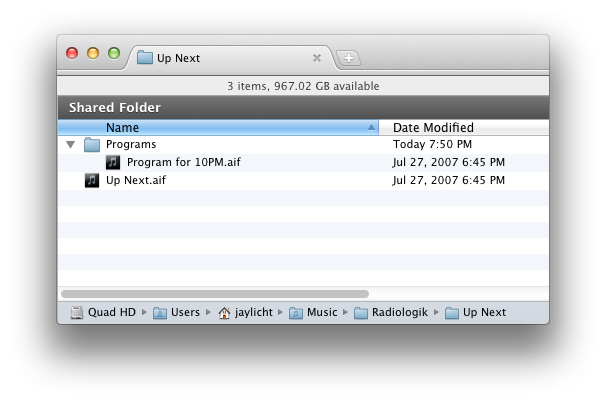
You can place an announcement of the upcoming program by using the next command. Place .aif files using
the program name to be announced in ~/Music/Radiologik/Up
Next/Programs/. Use the program name you use in Scheduler to
name the file program name.aif.
When a next command is used, it will place the Up Next audio file in
queue. When the next program schedules, that up next audio will be the
audio file used. This works best when you are scheduling segments near
their start time such as 20 minutes before which is the default and
when the next command is used between the time of scheduling and the
start time of the next program segment. So for 1 hours segments the
upnext command should be well after 45:00 or so to be sure to play the
correct up next audio.
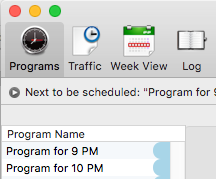
Example: If you have a 1 hour program at 9:00 and you put in an upnext command for about 9:45 in the script, that upnext command will actually use the program name of the 10:00 program. The point of the upnext is to announce what the NEXT program is. For illustration the programs are named for their times below. Program for 9PM will schedule at 8:40 and place the Up Next.aif at about 9:45. When 10:00 schedules at 9:40, it will copy the Program for 10PM.aif file to be the Up Next.aif file you see below. Since 9:00 placed the Up Next.aif file and it was switched at 9:40, it will play the Program for 10PM.aif audio now in the Up Next.aif file at 9:45.
You can make your up next files voiceovers so if they are placed in front of any tracks with ramps, they will voiceover. Append -vo to the artist or album tag of your program name.aif files.
For use with a voiceover which has been placed with a pick command using the -vo suffix. Follow that voiceover pick with a pick that chooses tracks that have -bed at the end of the artist, title, or album tag. That track will be a music bed and play at ducked volume until a few seconds at then end when it will fade up and end or fade up and fade down if the length needed to be shortened.
If the music bed track is longer than the voiceover, it will be adjusted to fit the voiceover.
If the music bed track is shorter than the voiceover, it will start partway into the voiceover so that it ends just a few seconds after the voiceover.
With music beds you can keep a smart playlist of music bed tracks in a
playlist in Music or Swinsian that rotates just like music does perhaps by least
recently played and each music bed will be fitted to whatever you have
for speech from the voiceover pick command. Use this for announcements,
news, weather, etc. You might find that using a pick to put a stinger
after this will finish it nicely.
DJ
Voices
Each segment can have a distinct DJ voice for intros, outros and time
announcements. Place your Intros, Outros and Time Announcement files in
a named folder inside the DJ Voices folder in ~/Music/Radiologik/DJ Voices/.
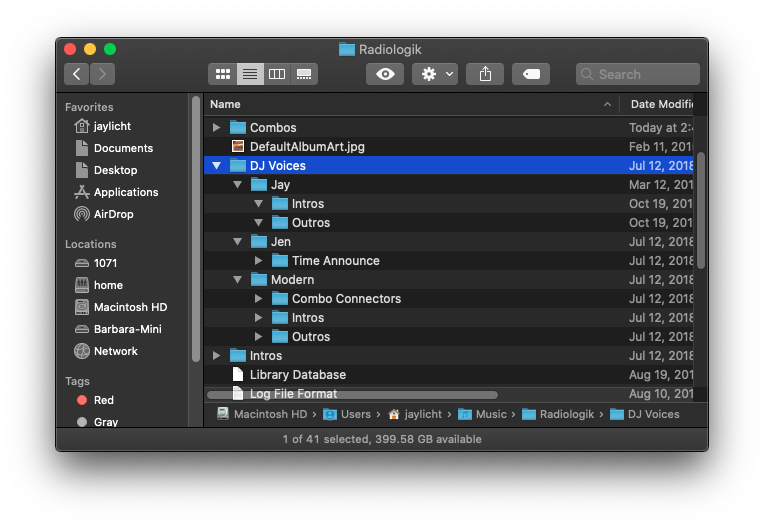
The DJ Voice menu will populate with these folder names. If an intro or outro cannot be found for the track in the DJ folder, no intro or outro is used. However if you use time announce and there are no matching times for the present time in the DJ Voices specific Time Announce folder, scheduler will choose from the default ~/Music/Radiologik/Time Announce/.
[podcast]
Podcasts
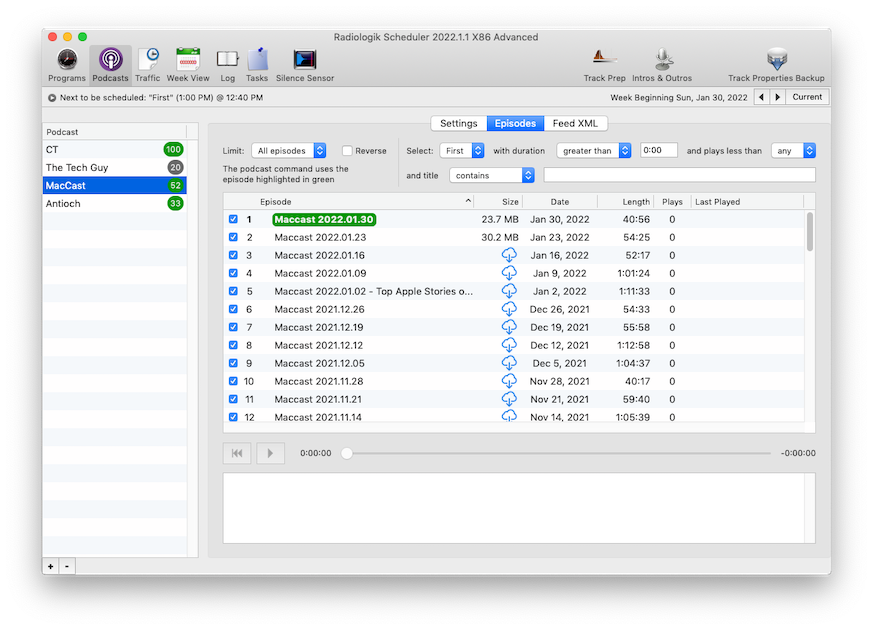
Subscribe to podcasts so you can schedule episodes in your radio programming. Then you can use the podcast script command to choose from the podcasts here. You will need the URL of the RSS feed XML. Many podcast carriers are hiding this so it has become somewhat of a research project to find a direct feed link. At the top is a search field to search podcasts.com in your web browser where typically you can find the RSS feed. You can name the podcast what you want for your own purposes in Radiologik Scheduler by clicking on the podcast name in the left column.
Set how often you'd like the feed to be checked for updates and using "Download Top", decide how many of the top episodes to download. At the botton of the settings you can choose actions to perform on the downloaded file such as running Track Prep on it, appending a date to the name in case the podcast publishes using the same file name for each episode, and Add to Music Library (not supported for Swinsian yet).
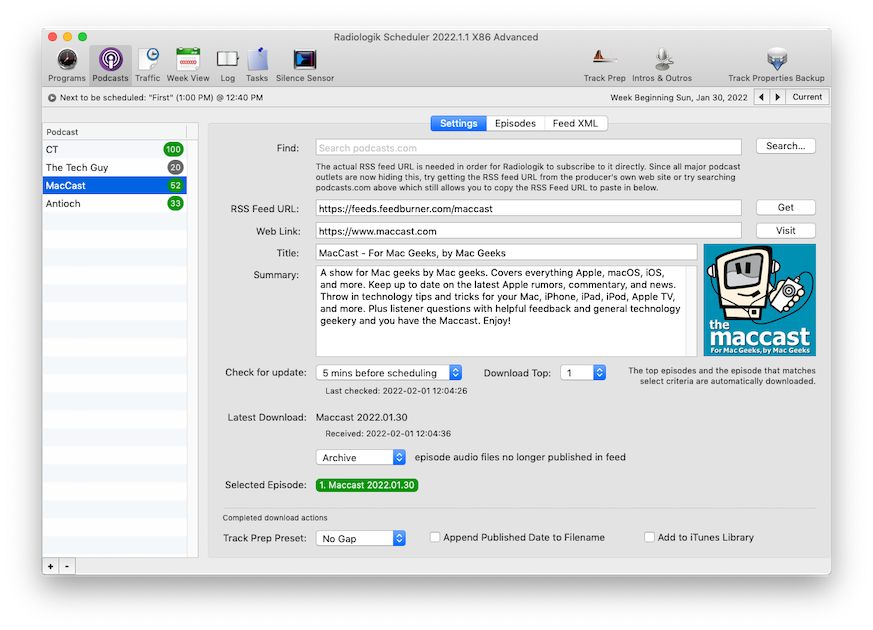
From the Episodes list you can limit the number of episodes shown and select episodes by rules such as a minimum or maximum time length, by inclusion or exclusion of a keyword in the titles. Radiologik DJ marks the episodes played with a play count so you can select by number of play counts. Also you can sort by Plays or Last Played to put the most often or most recently played to the bottom of the list.
The selected episode is highlighted in green and for quick reference of all of your podcasts you can see which ones have a selected episode by the highlighted episode count on the left list of podcasts to the right of each name where the episode count is. Podcasts with no selected episode are highlighted in gray.
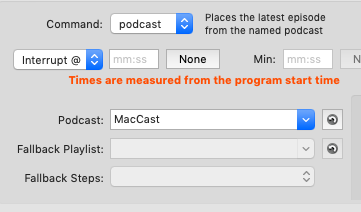
For the script, you use a 'podcast' command and select the podcast name you created. It works something like a pick command but only the interrupt option is available.
For more advanced uses of Podcasts, you can choose in Settings to Add to Music. That way you can use smart playlists to pick episodes by a very large criteria. For those who have programs broken into parts (multiple podcast episodes but one show), you can use multiple smart playlists to pick the correct parts (audio files) and then use multiple pick commands to intersperse the program parts with your own station's elements. Adding to Music also gives you options for playing from an archive or selecting an episode as a fallback pick in case no podcast episode is selected in the previous podcast command.
[spot] Spots/AdsFor the script, you use a 'spot' command as merely a marker as to how many spots can be placed. Then select a preferred Flight category. Flight categories are set on the traffic tab and by setting your preferred flight category you can specify what categories of spots should play at what times and in what order in your program. Everything else is handled on the Traffic tab.

Traffic

On the traffic tab, you can create a new flight for which you specify
the start and stop dates and hours and audio file. It is necessary to
have both a start and stop date as Traffic is usually meant for limited runs.
If you want something to run endlessly, consider just using a pick instead.
Then on the right you check the boxes for the the flight times days of the week and times. These flight times show only those weeks and hours in which there are spot commands in your program segments. These flight times will show how many are filled versus the total such as 2/3.
If you fill all the spots in the flight times, such as 3/3 then it will color green to indicate it is full. If you overfill these flight times such as 4/3, they will turn red. The red indicator will also show on the week view tab. Each week can be different depending on the start and stop dates of your flights so you can change the week forward and backward with the < & > buttons just above the flight times. Similar buttons are also provided on the Week View tab.
Flight Categories
You can set categories for your flights. This is useful if you want to
prefer a particular order of spots in the program. The program allows
you to set the preferred category for each spot command.
There are 20 categories besides the default. You can customize the names of the categories by pressing the Labels button. You don't have to worry about losing any assignments for the flights nor for the spot commands when you change the names of your categories. They are always remembered by their number.
How it schedules the spots
When the program segment is scheduled, the qualifying spots are
shuffled and evenly distributed into the different spot commands
proportionally to how many spots each spot command has. So if you don't
have enough spots for the openings, they'll be spread more thinly. If
you overbook, all of the scheduled spots will still be scheduled.
When there are categories for the spot commands, it will still try to evenly distribute the spots but it will try to match the categories. The main priority is to make sure all ads are placed evenly and are placed as they are being guaranteed. Category matching is a secondary priority. If it can't match the category, then for a non default spot command it will prefer a default flight. If it can't find a default category flight, then it will choose a flight at random.
Cards Analogy
Think of a dealer dealing cards. In this analogy, we'll define:
player = spot command
players = all of the spot commands in a script
cards requested by player = spot command "how many"
suit requested by player = spot category
dealer's cards = scheduled flights for this program
The dealer shuffles the cards. Then the dealer goes to each player. For each player, the dealer asks the player what suit he requests and searches his cards for a matching suit and if found, gives a card of that suit. The dealer uses a ratio of dealer cards to cards requested by players to determine how many cards that player should have in order to evenly distribute the dealer cards. If there are more player requests remaining than dealer cards, the dealer is allowed to skip to the next player. If the correct suit isn't found, then the dealer looks for a non-suite Category 0 card. If one cannot be found, and there are not more player requests remaining than cards, the dealer will insist on dealing some card which will then have to be a suit the player didn't request. The dealer only goes around the table once in the order of the script.
If Run overbookings is on, then the dealer evenly deals more cards than the players asked for to make sure all cards are dealt.
Silence Sensor is a tool that can listen to the default stereo channels on an audio source device and take action if the loudness is below a determined level for a determined amount of time. Actions are AppleScripts for both the error and restore conditions. When you create a new script for one of these, there are examples already in the initial script for notifying by email with Apple's Mail, SMS through Messages, and taking action such as adding a playlist to the program queue if no tracks are in queue.
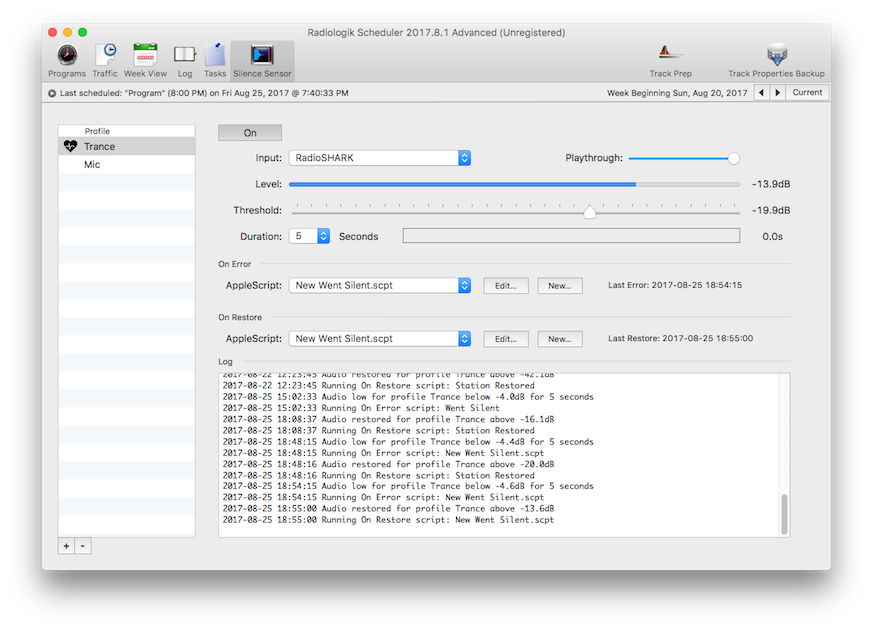
To use Silence Sensor, you must create at least one Silence Sensor Profile. Pick the Sound input device you want to monitor and press the On/Off button to turn it on. You may need to experiment to find the right threshold and duration. Once a profile is turned on, it stays on as long as Scheduler is running. If Scheduler is quit and relaunched, Silence Sensor restores its state.
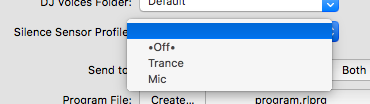
With the ability to create different Silence Profiles, you can set different thresholds and durations for different audio content. Rock may need to be very different from Classical as Classical may have much greater dynamics and require a lower threshold and longer durations. By using Profiles, you can coordinate different Silence Sensor settings and scripts for different programming. Silence Sensor Profiles can be set per prgram on the Program item in the toolbar on the Program Properties & Times tab and are active for the scheduled segment. If the program segment has a start time of 8:00 PM, that is when the selected Silence Sensor Profile action is taken. By default, each program starts with nothing for the Silence Sensor Profile which indicates no action is taken. The actions that can be taken are to start a Silence Sensor Profile and stop one.
There are a couple utilities that help with Track Properties that are kept in the scheduler so they don't chance interference with the performance of DJ. Track Properties contains data about how a track should be overlapped, how it is trimmed, how it fades in or out, as well as an end note to the DJ about how the track ends and the ramp time which is the time the DJ can talk into the track. All track properties can be set in DJ by selecting a track in a list and selecting properties in the bottom right.
Track Prep
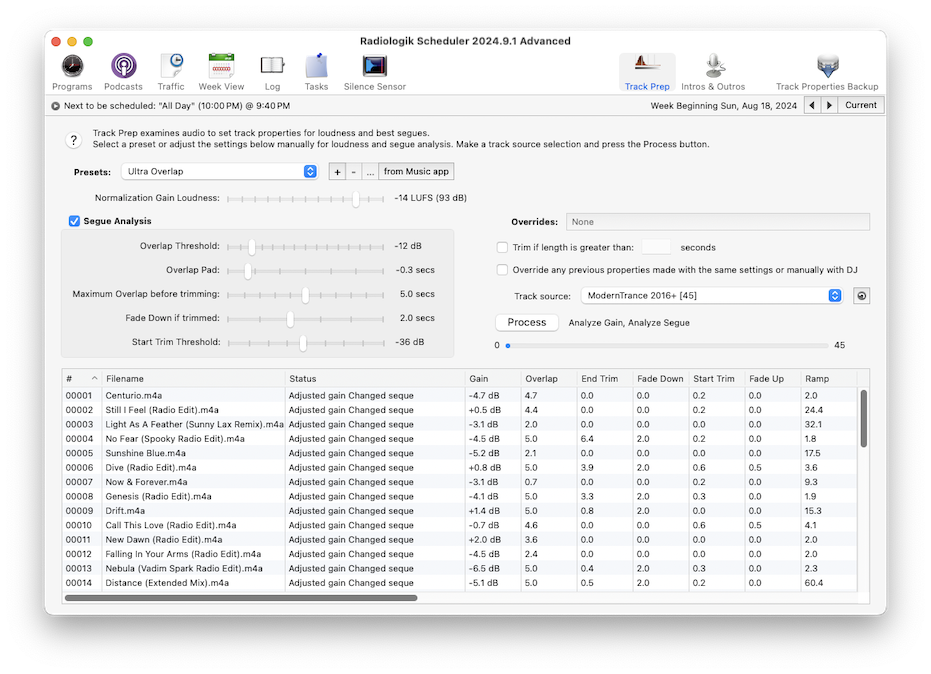
Normalization Gain Loudness:
Audio files are analyzed by ReplayGain 2.0 to determine the loudness gain adjustment
to make all of the tracks sound the same loudness when played with Radiologik DJ. You can
set the desired loudness in LUFS. The ReplayGain default is -18 LUFS.
Apple Music uses -16 LUFS which is also the Track Prep default.
Spotify, YouTube and many others use -14 LUFS. At -14 LUFS you should find the meters in DJ
peak just above -6 dB (yellow) during louder sections.
Clipping protection is enabled for positive gain values only, with max true peak at -1.0 dB
You can set the level to Off/Remove to skip analysis and remove previously set gain levels from the track properties. When there is no gain value set by Track Prep, DJ will use Music Sound Check instead.
Radiologik DJ support is in version 2024.9.1 and newer. To use the gain values in Radiologik DJ, go to Settings--Audio I/O and check the box near the bottom.
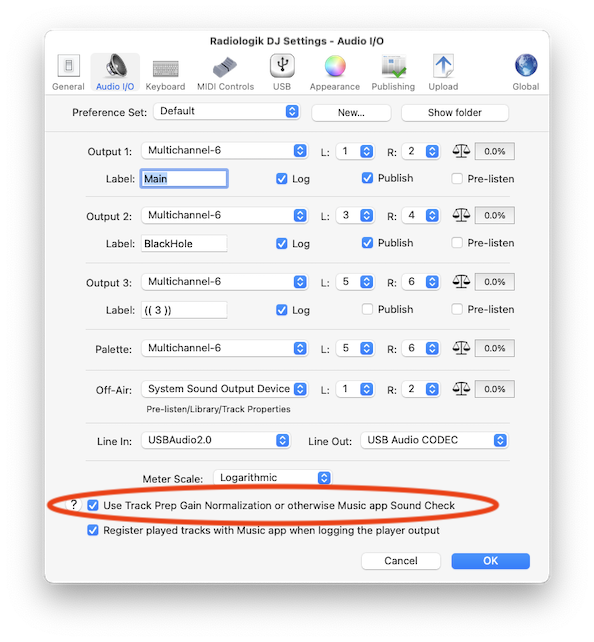
Track Prep Gain Normalization in Radiologik DJ
Segue Analysis
Overlap Pad:
From that
threshold point you can choose to pad how much past the threshold to
place the overlap (the place where the next track is started). You can
even pad negative to force the overlap closer together. Use -0.3 to
make a tiny overlap even on cold ending songs.
Maximum Overlap before trimming:
You can also set the maximum length of overlap. If the overlap point is
further into the file than the overlap length allowed, the right trim
is adjusted to compensate and the fade down value from that slider is
applied. If the overlap point is less than the maximum overlap, the end
trim is not adjusted and no fade out value is used.
Start Trim Threshold:
You can
also select to trim the starts. This looks up to 10 seconds into the
song looking for the threshold you choose from -48dB to -24dB. If the
threshold is at least 1.0 seconds into the file, the files is trimmed
0.5 seconds before the threshold and a 0.5 second fade up is set. With
the threshold at some value other than off, if any leading silence of
0.2 or longer is found, it will be trimmed.
Trim if length is greater than:
Yet another feature is to limit the length of tracks. When you set a
maximum length in seconds, it shows what that is in hours, minutes and
seconds and any track that exceeds that is trimmed and faded according
to the 'fade down if trimmed' value.
Override any previous overlaps:
If you made changes already in DJ to the overlap, by default using this
will not process the file. It's assumed
you already manually adjusted the file and want that. However if you
want to override that, there's a checkbox on this tab to do so.
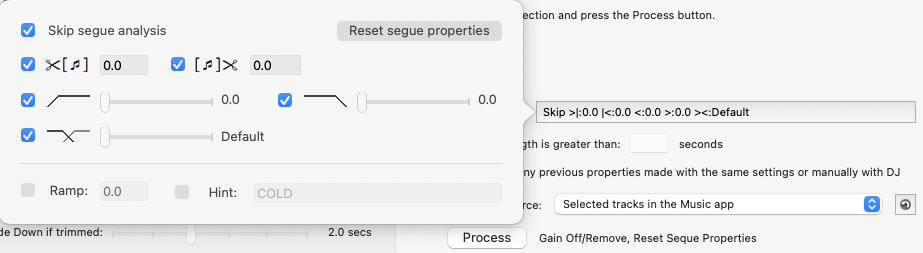
Overrides:
Use this to set several different arbitrary track properties in batch.
If you wish to remove the segue properties, press the "Reset segue properties" button,
click away to dismiss this popover and then process.
Presets:
There are four presets
(Heavy Overlap, Light Overlap, No gap, Even gap) intended as baselines
and also to instruct on how to set the values for certain results.
Track
Properties Backup
You can backup all of
the track properties of all the files that have Track Properties by
doing a snapshot.
You don't have to have Music or Swinsian open but any songs for which you have track properties must be in Music/Swinsian. Select the Track Properties tab from the main window, press snapshot to file.
If you have done changes to your tracks such as re-ripping to a higher bitrate or to AAC instead of mp3s, as long as the files have the exact same path with the exception of the file extension (.mp3 or .m4a), you can restore properties from the file you saved earlier.
Troubleshooting Program Builds
Reverting to backup
Backups of the Schedule segments and Traffic are made daily at
midnight or can be made manually from the File menu. The backups are
made to ~/Library/Application Support/Radiologik/Backups/.
To restore the schedule segments and/or traffic from a backup, select the program segment you want to restore from backup and use the File menu to restore selected program or all programs from backup. To restore the traffic from a backup:
Logs
Radiologik keeps logs in ~/Library/Logs/Radiologik/ viewable on the Logs pane
of Scheduler. Log--Browse All--Errors.log may reveal issues
and that can be emailed. If you have issues with Scheduling and
playback, sending a log for the day from both Scheduler and and
Play Logs is very helpful in showing what issue you might be
having such as with how a Scheduler script executed. Each program has
a Last Log tab to easily find the log for a single program if that's all
that needs to be examined.
Unless it is indicated in the logs, report the version of Radiologik DJ and Scheduler, macOS version, and which model Mac and any other relevant information.
Email to jay at macinmind dot com.
To edit advanced options, quit Scheduler, open the scheduler's preference file ~/Library/Preferences/Radiologik/Radiologik Scheduler Preferences in TextEdit, make the change to the text file, save and relaunch Scheduler.
OnlyShowPlaylistWithRegExMatch
Set this to a regular expression search term to only show playlists
that get a match
e.g. OnlyShowPlaylistWithRegExMatch=radio only shows playlist with
"radio" in them
e.g. OnlyShowPlaylistWithRegExMatch=[A-Z] only shows playlists with at
least one capital letter
See http://regexpal.com/ for
reference
When updating to a new version via the built-in version updater, the altered application name for each instance is kept.
Files for Radiologik are stored in the following locations where ~/ = home directory:
| Preferences |
~/Library/Preferences/Radiologik/ |
| Database & Saved
States |
~/Music/Radiologik/ |
| Schedules |
~/Music/Radiologik/Schedule/ |
| Time Announcements |
~/Music/Radiologik/Time
Announce/ ~/Music/Radiologik/DJ Voices/[DJ Name]/Time Announce/ |
| Voiceover intros |
~/Music/Radiologik/Intros/ ~/Music/Radiologik/DJ Voices/[DJ Name]/Intros/ |
| Voiceover outros |
~/Music/Radiologik/Outros/ ~/Music/Radiologik/DJ Voices/[DJ Name]/Outros/ |
| Up Next audio |
~/Music/Radiologik/Up
Next/ |
| DJ Program Files |
~/Music/Radiologik/Programs/ |
| AppleScripts |
~/Music/Radiologik/Scripts/ |
| Logs |
~/Library/Logs/Radiologik/ |
| Schedule & Traffic Backup |
~/Library/Application
Support/Radiologik/Backups/ |
You may not sell copies of this software. You may not rent, lease, or distribute this software as part of a sampling package without the permission of the author. You may not decompile, disassemble, reverse engineer, copy, or create a derivative work from this software.
Limited Warranty/Limitation of Liability:
This software is licensed as is with the removal of registration reminders for Advanced mode. This software allows you to "try before you buy" and I operate on the understanding that you are satisfied with the software before you purchase a registration.
This warranty is in lieu of any other warranties, express or implied, including the implied warranties of merchantability and fitness for a particular purpose. In no event will the author be liable to you for damages, including any loss of profits, lost savings, or other incidental or consequential damages arising out of your use of or inability to use the software.
Customer Support:
I will attempt to answer technical support requests from registered users, but this service is offered on a reasonable efforts basis only, and I may not be able to resolve every support request. I can support the software only if it is used under conditions and on operating systems for which it is designed.
General:
If any provision of this Agreement is found to be unlawful, void, or unenforceable, then that provision shall be severed from this Agreement and will not affect the validity and enforceability of any of the remaining provisions. This Agreement shall be governed by the laws of the State of Illinois.
rsgain license:
Copyright (c) 2014, Alessandro Ghedini
All rights reserved.
THIS SOFTWARE IS PROVIDED BY THE COPYRIGHT HOLDERS AND CONTRIBUTORS "AS IS" AND
ANY EXPRESS OR IMPLIED WARRANTIES, INCLUDING, BUT NOT LIMITED TO, THE IMPLIED
WARRANTIES OF MERCHANTABILITY AND FITNESS FOR A PARTICULAR PURPOSE ARE
DISCLAIMED. IN NO EVENT SHALL