 Master Key - Typing Tutor
Master Key - Typing Tutor
Master Key - Typing Tutor
The main objective is of course to teach typing or help typists improve their speed. In so doing Master Key is written to do this for a broad audience of home users, school users, children 7 and up and adults, networked computers with accounts or individual computers, and to do any combination of these equally well to the highest quality level without making any compromises.
Progressive drills for QWERTY, Dvorak, AZERTY, and QWERTZ keyboards See Getting Started to get started right away.
Individual Scoring and History Each user gets a Pupil file which contains the detailed history of the Pupil’s typing performance. In addition the log can be saved and the graph and log can be printed. See History
Mastery Goal and Certificate Printout The status of your Mastery and what is required for Mastery are presented in the History window and a summary of the status of mastery for each drill appears in the main window. Once you have achieved Mastery for a Drill, you can print a Certificate of Mastery acknowledging that you have mastered that Drill. See Lesson Plan
Type Downloadable Books Put a book you downloaded from Project Gutenberg, or any other long plain text file, in the Drills folder. Master Key will paginate the book so you can pick a page at a time to do as a drill.
Create Your Own Drills The Drill Editor allows you to edit existing drills or create new ones. It features key vocabulary filtering while typing or pasting text and the ability to write your own typing tips. See Drill Editor
Multiple Class Support with Class Editor and Class Reports Pupils may be divided into classes and Drills may be divided into Units so that an entire school may leave all the Pupil and Drill files in one file structure. Pupils may choose their class at any time or be prompted when Master Key is launched or when a Pupil logs-off. Teachers may conveniently edit the settings of a Class of Pupil files at a time and switch between classes easily. All of the settings for all of the Pupils in a Class can be edited at once and selectively applied to single or multiple Pupils. This is a fast way to assign a particular Drill and Speed Goal to a whole classroom. Teachers can than see the results of an entire class at a time and easily open each pupil history in the Class Reports. See Classes & Units
Support for Centralized Files on the Network Master Key can share a large centralized set of Pupil files and Drills with other users on an file-sharing network, allowing any user to use any lab computer whether Mac or Windows. In addition, a single set of preferences can be used for all lab computers, ensuring consistency and simplifying the changing of settings on multiple computers. It can also be setup to work with individual network accounts. See Multiple-users/Network
Rules and Options The Teacher can can turn several abilities on and off for Pupils. And users can have their own subset of options for Display and Sound. See Preferences
Two-tier Password System Passwords for both Pupils and the Teacher can be turned on and off. The Teacher password is a master key to all Pupil files. Teachers can change their passwords and decide whether or not Pupils can change their passwords. See Passwords
If you are not using Account Mode, you first need to create a new pupil file or choose one that you've previously created from the main window. Otherwise skip to Choosing a Drill.

New Pupil For a new Pupil click the I'm A New Pupil… button.

If you create a new Pupil you will be prompted to choose a Class and type your name, and if Pupil passwords are required, you will be asked to provide a password.
Choose Existing Pupil All existing pupils can be found by clicking the Choose My Pupil... button.

From the left column, select your Class, from the right column select your name (or Pupil file name) and then click “OK”.
Choose Drill Choose your test by clicking the Choose Drill… button.

From the left column, choose the Unit, then choose the Drill from the right column and then click OK. Beginner typists should choose the numbered unit of the keyboard they want to learn.
Speed Goal, Timed Drill and Introduction

Progressive units have speed goals built-in. Other drills allow you to set your own speed goal.
Timed drills may help add structure to the process of taking drills and aid in reaching your speed goal. If the time exceeds the length of the drill, the drill content is repeated until the time is expired. With Timed Drill off, the drill is a fixed length instead of fixed time. For the most part you may want to avoid timed drills for progressive units. Some drills may actually get easier and your speed may increase during the drill making it easier to achieve mastery.
If you choose the Introduction checkbox, you will receive an overview of seating posture and finger positions before starting the Drill.
Start the Drill
Press the Start The Drill button.

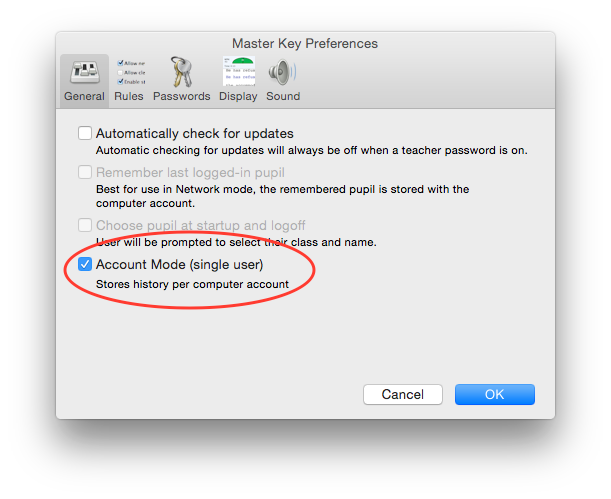
The preferences are in the Master Key menu

Automatically check for updates With this option on, Master Key will check for updates no more often than once a day when launched. If a new version of Master Key is found, an option to download is presented. You can also manually check for updates from the Master Key menu. This option is always off when Teacher passwords are on. Manually checking for updates from the Master Key menu is password protected when the Teacher password is on.
Remember last logged-in pupil This feature is most useful in multiple user environments. With this option checked Master Key records the last logged-in Pupil in the current user's preference folder. When the user opens Master Key from then on, his pupil file is loaded. Master Key will not ask for a password, even if Pupil Passwords is turned on since the user has accessed this pupil file before. If the user logs-out the pupil, the user will be asked for a password for any other pupil file if Pupil Passwords is turned on.
Choose pupil at startup and logoff With this option selected, when Master Key is launched or when a pupil logs-off, the user is immediately asked to select his/her class and name except if the Remember Last Logged-in Pupil option is on and there was a pupil to remember.
Account Mode With this option on, Master Key pupils are always associated with the one user of the current computer Account. For more information, Multiple Users/Networks
Hide "Master Key Network" folder Only available when Master Key is used in Network mode and only used on the Mac, when this option is checked the Master Key Network folder is made invisible. This is used to hamper casual deletion of Master Key files on the server by users.

Require Mastery in order to advance to next progressive drill With this option on, the pupil must master one drill before proceeding to the next. It is enforced on any progressive unit. More accurately, it looks for a leading number in the Unit folder name and looks to make sure "generator" is not in the name of the unit folder. You could therefore make your own progressive units by using a leading number in the unit folder name.
Use double-spaces between sentences This option is provided for those who want the anachronistic rules of the typewriter. Generally it's advisable to leave this off. Master Key attempts to remove extra spaces from those files that have them with this off and add them when they are not present when this option is on, regardless of what the actual text file contains in spacing.
Allow backspace This option allows the delete key to be used to correct mistakes.
With it on, Accuracy is the final result of what you typed and 98% accuracy is required for mastery while an error rate, which is what was typed incorrectly regardless of corrections, must be 5% or less for mastery.
With it off, Accuracy and Error Rate become the same so that 98% must be typed correctly in order to achieve mastery.
Other rules Most of the rest of these rules are intended for a teacher that wishes to control the abilities for students. To enforce these rules, the teacher would turn on passwords for teacher on the next pane.
Enable User-level options This feature is particularly useful in multiple-user environments. With this option on, pupils are granted access to a subset of preferences that they would not be able to access if the Teacher password is enabled. As the name implies, these user options are not global nor are they assigned to the pupil but rather they are preferences stored in the default preferences folder of the account for the respective OS. In a multiple-user's environment, this would be the user's own preferences folder. On the Mac, in Users/[username]/Library/Application Support/Master Key/Master Key User Options. On Windows in username\Documents and Settings\Application Data\Master Key User Options
Users are granted all of the options on the display and sound panes.
The default user options are determined by the corresponding preferences set in the preferences window so that new users inherit these preferences.
The next pane is covered in Passwords

This pane is also available to users when access to preferences is password protected and Enable User Options is on on the Rules pane. Except for the Font Size, you can change any of these during a drill.
The Key Layout changes the display layout in the animation. On the Mac, it will also change the actual layout but you must have that key layout checked so it's available to switch to. You can find key layouts in System Preferences:International:Input Menu. In Windows you can set the keyboard layout on a per-application basis and Master Key will also adjust its display to most common layouts. You can find the key layouts for Windows in Control Panel:Regional and Language Options:Languages:Text Services and Input Languages:Details
The progressive drills are written primarily for U.S., Dvorak, Colemak, French, and German. Dvorak is purported by many to be a more efficient layout of keys for the English language. On the Mac, the nicer Dvorak layout is the one that retains the command keys to the QWERTY positions. Colemak purports to be even more efficient but must be installed separately since it is not included with Mac or Windows.
Font Size Small and large type. Larger might be more useful for younger typists or larger screens. This is the only option that can't be changed during a drill.
Show keyboard animation and show hand outlines The key animation shows which key is next to be typed in white and which was last typed darkened. Hand outlines give a general idea for hand position on the keyboard. Animation may be too demanding on slower Power Macs and earlier Macs to type much faster than 20 words per minute and should be turned off for faster speeds. On G3 Macs, the animation will be fast enough for the fastest typist.
Show finger position chart With this option on turns the color-coded key position chart on and off.
Show WPM heads-up display This option will underlay your words per minute underneath the text your are speaking much like a watermark on paper. This allows you to read your speed without taking your eyes off the text you're typing.
Hide other applications With the Hide Other Applications option checked, Master Key will draw a solid color for the entire background outside of the Master Key windows. The color can be selected using the Color... button

This pane is also available to users when access to preferences is password protected and Enable User Options is on on the Rules pane.
For Key Sounds, you may choose Standard or Subtle for a pleasant audible feedback or you may choose from one of the typewriters. The typewriters sounds are sampled from actual typewriters and include many more sounds such as the shift key and paper insertion. The typewriter sounds are mostly for fun. The Typo Sound is the sound made when you make an error and includes the sound of a small Burmese cat named Sasha.
In the Main Window
You can set your own speed goals for those drills which do not contain a speed goal, otherwise this cannot be changed.
You can set a timed-drill for 1 - 10 minutes. If the time exceeds the time to finish the drill, the drill text will rotated until the time is run out.
The Introduction checkbox allows you to see three screens on posture, finger position and basics about how to use the drill window.
In the Drill Window

Here you can choose to show or hide the keyboard display and set a metronome to help with rhythm. Although not a perfect metronome, it may help to use this to establish a rhythm. The numbers represent the approximate words per minute beat. You may find that putting this about 10 WPM above your speed goal may be well enough to make up for missed beats and errors you make make while still allowing you to accomplish your speed goal.
The preferences are in the Master Key menu on the Mac and in the Teacher menu in Windows. Select the Passwords Pane:

Two-tier Password System To require either the Teacher password or Pupil passwords, select the appropriate items.
Requiring Pupil passwords will keep students out of other student’s Pupil files. If a password has not been set or if it is a new Pupil, the Pupil will be prompted to enter a new password.
Requiring the Teacher password will protect the Preferences dialog and the The Class Editor. Master Key will ask for an initial password when the requirement is set. The Teacher password is the master key to all of the Pupil files.
There is a Logoff item in the Pupil menu so that a pupil can logoff and re-protect other students from seeing his/her history.
Passwords are case insensitive.
Changing Passwords The teacher can always change the teacher password in the Preferences.
If the Teacher allows Pupil Password Changing from the Rules pane in the Preferences, Pupils may change their own passwords by selecting the “Change Password…” item in the Pupil menu. The teacher can change the pupil password from within the Class Editor or by using the Teacher password as the old password.
Resetting Pupil Password The Teacher can also reset any or all Pupil passwords so that the Pupil is asked to provide the password when the Pupil logs in. To do this, set the password for the Pupil to “password” from within the Class Editor.
The History window can be viewed by selecting the History item in the Pupil menu or by clicking the See My History… button in the main test window. The first tab, Results, shows the results of the last drill you did and your status on accomplishing mastery minutes for that one drill attempt.

Mastery The second tab, Status, shows the progress to mastering the last drill attempted.
See A Lesson Plan for more.

Statistics Lots of interesting facts are kept here. Just keep in mind that the left column is only for the last Drill you took while the right column is either accumulations or averages of all the Drills recorded in your Log.
Log & Graph The Drill Log displays the test, number of words, the score, date and time. The Drill Log will hold up to 500 drill entries and then start rotation of those entries if any more drills are done. The oldest of the Drills recorded will be removed.
You may save the Drill log as a text file. The resultant text file will be tab-delimited, meaning that the tabs will be set so that you may arrange the columns in a word processor or you may import the text file into a spreadsheet easily.
The Graph gives a visual indication of how well you are progressing. You may remove some of the clutter of the lines by unchecking boxes for Accuracy, Error Rate and WPM. If you would like to print the log without the graph, uncheck all graph boxes before printing.
The Graph and Log are printable together using the button in the bottom right of this window.
Key WPM and Key Error Rate Both of these panes have graphs that provide information that you might find helpful to evaluating what are you strong keys and which you need to work on. These graphs only evaluate the last Drill you took.
You can create a new drill by selecting new from the Drill menu. You can also edit any plain text drills by selecting a drill and then selecting Edit from the Drill menu. Encrypted drills, which are the progressive drills for QWERTY and Dvorak from Drill 7 and up are not editable.

Two display sizes of small and large give you and approximate idea of how the drill will look. The Drill Editor opens using the size set in the Preferences.
You can set the speed goal for the drill. If you set a speed goal for a drill, the pupil cannot set their own speed goal.
Use the Key Vocabulary tab to restrict what letters can be entered in the the Drill Text field. If you have no key vocabulary or new keys, the Drill Text field will not have any restrictions. The key vocabulary will also show these keys darkened at the introduction of the drill. You can add return to the vocabulary by typing the return key in this field. It will show as a paragraph symbol.
New Keys are considered part of the key vocabulary and will display the keys blinking at the introduction of the drill.
You can also copy text from another source and paste it into the Drill Text field. With a normal paste, the key vocabulary will not be enforced. If you select Paste Using Vocab from the Edit menu, it will only paste words that contain all of the key vocabulary. It will also filter curly quotes to straight, adjust returns and give double spaces between sentences. It's best to have double-spaces in the drill even if you've selected to not use double-spaces in the preferences. This way Master Key will remove the double spaces but leave them in if you have double-spaces on.

In the Tip field, enter any typing tip you like. You can use returns to separate paragraphs. This tip will be presented in a window at the introduction of the drill.
Once you are satisfied with your drill, you can save it to the Drills folder or a Drills subfolder that you created. Then close the Drill Editor and give it a try.
What are they? Pupils may be combined into groups called “Classes”. Each Class is a folder within the “Pupils” folder which is located in the “Master Key” folder or “Master Key Network” folder. To use this, create new folders within the Pupils folder and name them the Class names. Then drag the Pupils into their appropriate Class folders.
You may create the Class Folders in the Class Selection for the Class Editor and create Pupils in the Class Editor.
Drills may be combined into groups called “Units” in the same way that Pupils can be grouped into Classes. Just create new folders in “Drills” folder and name them their Unit names. Then drag the appropriate Drills into these folders.
You can also create Class and Unit folders and organize the Drill and Pupil files in the Mac Finder or Windows file browser like you would with any other files.
How do I remove Pupils or Drills I don't want? Each Pupil or Drill is a file so you can remove anything you don't want in the Finder. If you have no use for AZERTY drills for instance, you can remove the entire unit folder.
In the version outside of the Mac App Store, choose Show Master Key Data Folder from the Teacher menu. That will take you to: ~/Library/Application Support/Master Key/
For the Mac App Store version, in the Finder, use the Go menu with the option key to open the user's Library folder and navigate to Containers/com.macinmind.masterkey/Data/Library/Application Support/Master Key/
In Network Mode: Inside wherever you've located your "Master Key Network" folder
Open the Class Editor by selecting Edit Class… from the Teacher menu.
You are then asked to choose the class in much the same way you would be asked when you choose a pupil. The difference here is you are selecting the whole class and not an individual pupil.

The Class Editor will take a look at all of the pupils in that Class folder and show this list on the right listbox.

Note: The Class Editor is limited to editing five pupils for Standard Edition but virtually unlimited for Classroom Edition.
Settings can be selectively applied to several Pupils at once by clicking and dragging through the list of Pupils. To select multiple noncontiguous Pupils, hold down the Command key (Control key in Windows) and click each Pupil.
The Class Editor does not remove Pupils. Pupils can be removed like any other file in the Mac Finder or Windows file browser. These files are in the Pupils folder.
For a class of new Pupils, if you will be setting all of the Pupil passwords, you may also turn off the requirement for Pupil passwords (in the Preferences) while creating new pupils, set them all in the Class Editor, then later turn the Pupil password requirement back on.
If you created pupils without giving them passwords and you don't give them passwords in the Class Editor and you turn on the pupil password requirement in the Preferences, then the pupil will be asked to provide a password when he/she chooses his/her Pupil file.
Tip: To allow the pupils to set their own passwords at login time, set the pupil's password to "password" in the Class Editor.
Select Class Report from the Teacher menu.

Here you can read overall statistics for a class for all drill history or you can restrict it to the last 5, 10, or 20 drills. You can then export this as tab-delimited text file or print it. You can also open the history window for each pupil by double-clicking the pupil or selecting the pupil and then pressing the Details button.

On the Class Mastery tab, you can focus on a particular drill and how a class of pupils is progressing on that drill.

On the Pupil Mastery tab you can choose to see the status of mastery for any unit for any pupil, and if the drills do not contain a speed goal, you can choose to apply the speed goal you want to the analysis of the unit. From here you can choose to print a mastery status page for any pupil.
Master Key is not a typewriter It is not the aim or intention of this program to teach typing on a typewriter. Therefore, returns are only used to mark the ends of paragraphs as all computer automatically wrap type from line to line. To use returns for every line on a computer is to constrain your ability to easily format your text later. The delete key is allowed and even encouraged to some extent. Although it is optional to disallow it in the Preferences on the Rules pane.
Learning a new keyboard Beginner typists should begin with the progressive unit for the keyboard they wish to learn such as 1-Learning QWERTY or 2-Learning Dvorak. Proceed through the drills to accumulate mastery minutes. Try a drill generator drill which has your vocabulary such as in 1.1-QWERTY Drill Generator. At your option, Master Key can constrain to a linear path through a progressive unit. You can find the option on the Rules tab of the Preferences.
Practicing for 20-30 minutes a day will work well. You can keep working longer but a lot of the time great strides are made the next day after you give it a rest.
Achieving Mastery for a Drill Mastery is the goal for which you must accomplish the words per minute speed goal with a 98% accuracy (missed keys after corrections) and 5% or less error rate (missed keys despite corrections) for 10 minutes. Or meet the accuracy and error rate requirements and exceed the speed goal by 10 WPM for one drill. If you disable backspace in on the Rules tab of the Preferences, the accuracy requirement is reduced to 95%. Progressive units such as 1-Learning QWERTY have predetermined speed goals but other drills allow you to set your own speed goal. The 10 minutes are accumulated as mastery minutes and are totaled from the entire history.
In order to achieve Mastery for a particular Drill you must accumulate 10 Mastery Minutes. In order to receive Mastery Minutes, you must fulfill four qualifiers for that number of minutes on the same drill.
2. You must match or exceed 98% accuracy (95% with backspace off in the Preferences). Accuracy in Master Key is defined as the final resultant accuracy of your text after corrections.
3. You must stay under or meet a 5% error rate
4. You must accomplish the above three for 10 minutes on that named drill OR you can shortcut that by exceeding the speed goal by 10 WPM or more in one drill.
Once Mastery is achieved, the Print Certificate… button will become active and a certificate can be printed. This button will always be dimmed prior to Mastery of a Drill.
Improving speed Drill generator drills are a nice diversion to practice with your own speed goal with the key vocabulary you currently have learned. Typists who already know the keyboard can choose Full Keyboard and keep notching their speed goal up themselves. Or they can choose one of the entertaining texts while typing.
Master Key also allows for any plain text file to be used as a Drill. Just save the file as a plain text file from any word processor, TextEdit or WordPad, and drop it in the Drills folder or one of the Unit folders in the Drill folder. The file should have a .txt extension on it for Master Key to see it. You may also create your own Unit folders in the Drill folder to keep your own drills separate from those that ship with Master Key. Larger text files will bring up a window for you to choose a page of that document to use as a drill and there are also filters to clean text to make a better drill in case you use a downloadable books such as from Project Guttenberg.
There are quite a number of options setting up Master Key for multiple-users either on or off a network. To help keep the terminology clear and distinct, Pupils are the users in Master Key and Users are the accounts. There are three setup options:
1. Single or Multiple Pupils on a single computer 2. One Pupil per User on or off network 3. Centralized Pupils on network shared folder
1. Single or Multiple Pupils on a single computer This works well for an individual computer where there is only one account used but there are multiple users. The Master Key folder must have read/write permissions so that pupils can be read and written to the Pupils folder in the Master Key folder.
Go in Preferences and turn off Account Mode.

Now you can create new Pupils using the "I'm a New Pupil" button.
2. One Pupil per User account on or off network This works well for both local and network accounts. The advantage is the administrator does not need to create any Pupils or at least the users would not have to create their pupil files. The disadvantage is that the administrator does not have settings or reports for the pupils.
The Pupil will take on the name of the account. The pupil data is then saved in the file "Master Key History" in the User's preference folder on the Mac or the "Application Data" folder in Windows. It is not possible to have more than one pupil per account nor is it possible to change the name of the Pupil.
This is made active by the Enable Account Mode preference in Master Key on the General tab.
You can include the preferences with the distribution to client computers. Once registered and all options are what you want, select Teacher menu--"Show Master Key Data folder" and then quit Master Key. Create a new folder and call it Master Key in your Applications folder and place the Master Key application in it.

Copy "Master Key 6 Preferences", which will contain all the options as you like and the registration, and place it in the same folder as the Master Key application. This will be used as a read-only template file for creating preferences for all clients in their default preferences folders and it will always register Master Key regardless of the registration status of registration of existing account preferences. This Master Key folder containing the application and preferences can be copied to other Macs.
Another method would be to centralize the Drills and preferences on a network volume using the steps in option 3 below but by turning on Account Mode instead of centralizing the Pupils on the network volume.
3. Centralized Pupils on network shared folder It is possible to keep an entire organization's Pupil files on one file server and have students use Master Key from any Mac or PC that is on that network to access their Pupil files and all Drills. In addition, all Macs and PCs on the same network may share the same preferences file so that all clients have their settings changed by only changing the settings on one client. By your choice you may allow users to change a subset of these preferences called User Options. This preference can be found on the Rules tab in the Preferences.
Regardless of Mac or Windows you need either inherit permissions on or Access Control Lists on and set so that files are always read/write regardless of who last saved for all who access Master Key. For OS X Server, standard Unix privileges will not work for centralized Pupils.
A Graphical Example of the Network Setup

The server sharepoint (here named "Groups") can be one that you already have and can be anything. The MacinMind folder is optional. You just have to have the "Master Key Network" folder available as read/write for your users with Access Control Lists set to allow access or comparable read/write permissions on a Windows or other server. You should not make the "Master Key Network" folder a sharepoint itself.
Have Master Key install the Master Key Network Folder (Mac-only)
This network installation method works only using the version of Master Key outside of the Mac App Store available here to download
Note: This method will not work if the network folder is created on a different volume with the same name. e.g. if your hard drive is "Macintosh HD" and your mounted server volume is also "Macintosh HD". Use the manual method below in this case.
Login as a local admin on the client so that you'll have write permission inside the Applications folder. Run the Master Key installer to Install the Master Key folder in the Applications folder. Mount the sharepoint you wish to use using a login of one of your users.
Launch Master Key. If prompted as below select Multiple users if you would like to store the pupils on the network. The other option would only be to centrally locate the Drills and preferences.

Select the "Create Network..." menu item in the File menu.

Select the the location to place the "Master Key Network" folder on the server sharepoint. Follow the onscreen directions that follow for this menu item.
If you get any messages that preferences will be read locally and Network does not show in the title bar of Master Key. You may have incorrect permissions for your Master Key folder and/or for the folder on the server. Be sure to start again with a fresh copy of Master Key that has the Pupils and Drills once the permissions are correct to read and write in the Master Key folder as an admin.

Once done, logout of the client and log back in as your network user. Now when Master Key is launched you will be using the network folder on the network. You may skip to the final steps.
Create the Nework folder manually Login as a local admin on the client so that you'll have write permission inside the Applications or program folder. Run the Master Key installer to Install the Master Key folder in the Applications folder. Mount the sharepoint you wish to use using a login of one of your users.
If you haven't already, create a new folder on the server volume and name it "Master Key Network".

Set the permissions so that the user can read and write to the folder. Make an alias (Mac) or shortcut (Windows) of the "Master Key Network" folder back to the local "Master Key" application folder.
Note: To make an alias on the Mac you may begin dragging and then hold command-option before dropping to create aliases without disturbing their names.
Make sure the name of the alias or shortcut is "Master Key Network" and not "Master Key Network alias" or "Shortcut to Master Key Network".

Copy the "Pupils" and "Drills" folders into the "Master Key Network" folder on the server. The "Master Key Preferences" file will be created by Master Key when it is launched.

Launch Master Key and look in the title bar of the test window. If it says "Network" after the title and version, it is working. Otherwise, Master Key is using the preferences on the computer on which it was launched and is not sharing the central preferences.
Final steps If the preferences file is newly created, you will need to enter your registration code and name by launching Master Key on any client computer, selecting "About Master Key…" from the Master Key menu in Mac OS X or from the Help menu in Windows, clicking the "Enter Registration Code…" button, and entering the registration information given to you.
If on Mac, you can now go into the Master Key Preferences and select to hide the Master Key Network Folder for added security.
Once done, you will have an alias or shortcut "Master Key Network", "Master Key" application and on Windows a few other files such as "Master Key Help" and "polarize.mid". It is the Master Key folder that contains these items that you will then want to distribute to all the client computers. You can do this using Remote Desktop or NetInstall on OS X or similar distribution tools on Windows.
On Mac OS X you can add Master Key to the Dock for managed clients. See the Preferences Pane in Workgroup Manager.
You can import users from a text file from the Teacher menu or you can use Passenger which will do more in creating specific names and passwords.
Notes About Use If the server volume is not mounted, Master Key will ask to mount the volume. If the volume cannot be mounted, either because the permissions are not correct or the server cannot be found on the network, Master Key will report the error and use files on the local computer instead.
Pupil files are not locked as in-use. This means that a user can load the same Pupil file on more than one machine at once. The last one to unload the Pupil file records the Pupil file data. The best solution for this is to enforce the Pupil passwords or possibly something more clever than I've explored using Access Control Lists.
If you purchased Master Key from the the Mac AppStore, your copy of Master Key is registered and the following doesn't apply to your copy.
If you downloaded Master Key outside of the Mac AppStore, the unregistered Master Key functions as the Standard Edition but with shareware reminders and without the full set of typing drills available. Registering the Standard Edition removes all of the shareware reminders and allows opening of all the drills included. Registering the Classroom Edition additionally removes the 5-pupil limit in the Class Editor and Class Reports.
When you register, I will send you the registration name (your name or organization name) and registration number to remove all shareware reminders, allow use of all drills, and emblazon your name as a registered user in the About box. The about box will also indicate whether you have registered Standard Edition or Classroom Edition.
For pricing and purchasing, visit http://www.macinmind.com/MasterKey/Purchase Pay by credit card and receive your registration code within minutes.
Money orders or checks are accepted. Purchase orders are accepted for Classroom Edition registrations. See the web site for an order form to download and print.
The email you register with will be the name which appears in the About box. For the Classroom Edition, the name of the company or organization will appear in the About box.
Version 6.2.1This legal applies to Master Key outside of the Mac App Store
You can make copies of this software and distribute them as long as the software is not modified in any way, and as long as this document and drills that are packaged with the unregistered Master Key accompany the software.
You may not sell copies of this software. You may not rent, lease, or distribute this software as part of a shareware sampling package without the permission of the author. You may not decompile, disassemble, reverse engineer, copy, or create a derivative work from this software.
If you register this software to use at home or school, you may make a copy to use on a portable computer. If you use this software on more than one computer at a time, or over a network, you should purchase additional copies for each computer or user. You may make archival copies of the software for each License obtained under this Agreement. You may make copies of the written documentation which accompanies the software in support of your authorized use of the software.
Limited Warranty/Limitation of Liability This software is licensed as is with the removal of shareware reminders and additional drills for Standard Edition registrations. This software is licensed with the removal of shareware reminders, additional drills, and the ability to edit the settings of a number of pupils without the otherwise limited 5 pupil limitation for Classroom Edition registrations. Shareware allows you to "try before you buy" and I operate on the understanding that you are satisfied with the software before you register.
This warranty is in lieu of any other warranties, express or implied, including the implied warranties of merchantability and fitness for a particular purpose. In no event will the author be liable to you for damages, including any loss of profits, lost savings, or other incidental or consequential damages arising out of your use of or inability to use the software.
Customer Support I will attempt to answer technical support requests from registered users, but this service is offered on a reasonable efforts basis only, and I may not be able to resolve every support request. I can support the software only if it is used under conditions and on operating systems for which it is designed. See 11. Minimum Requirements.
General If any provision of this Agreement is found to be unlawful, void, or unenforceable, then that provision shall be severed from this Agreement and will not affect the validity and enforceability of any of the remaining provisions. This Agreement shall be governed by the laws of the State of Illinois.